mdoery ~ software development

adventures in coding

Bootstrap replaced .help-block with .form-text which breaks React Bootstrap

| Comments

Summary: Serverless Stack tutorial breaks because Boostrap renamed .help-block to .form-text, and the change was propagated to React Bootstrap without documentation

Following along with the Serverless Stack tutorial… Their “create the signup form” page has some source code which imports a component called HelpBlock:

1
2
3
4
5
6
7
8
import React, { Component } from "react";
import {
  HelpBlock,
  FormGroup,
  FormControl,
  ControlLabel
} from "react-bootstrap";
...

If you try this out using react-bootstrap v1.0.0-beta.5, you’ll see the familiar “Failure to compile” message at localhost:3000, with the error 'react-bootstrap' does not contain an export named 'HelpBlock'.

It turns out that Bootstrap replaced .help-block with .form-text. This is not documented in the react-bootstrap project. It looks like it was removed between version v0.32.4 and v1.0.0-beta.0, September of 2018. To fix the problem, just replace HelpBlock with FormText in the Serverless Stack Signup.js code. You will also have to replace .help-block with .form-text in Signup.css.

You may also see a warning message in the Javascript console which comes from their LoaderButton widget. It reads

1
Warning: React does not recognize the `bsSize` prop on a DOM element. If you intentionally want it to appear in the DOM as a custom attribute, spell it as lowercase `bssize` instead. If you accidentally passed it from a parent component, remove it from the DOM element.

The solution is to find every instance of bsSize="large" in the code, and replace that with size="lg".

React Bootstrap renames ControlLabel to FormLabel

| Comments

Summary: Serverless Stack tutorial breaks because React Boostrap package renamed ControlLabel to FormLabel

Here’s another tip on the Serverless Stack tutorial. Their “create a login” page has some boilerplate to create a login page. When you copy it to your containers directory, you get this error in your browser at localhost:3000:

1
2
./src/containers/Login.js
127:14-26 'react-bootstrap' does not contain an export named 'ControlLabel'.

Looks like this happened about Nov 2018. Just change every reference of ControlLabel to FormLabel and you’re good to go.

Styling React Bootstrap

| Comments

Summary: Using styles with React Boostrap package

When following the React Bootstrap tutorial at Serverless Stack, I immediately noticed that my views looked unstyled. They had the plain vanilla look of raw html, whereas the Serverless Stack views looked more fancy.

I’m not sure why, but I think it might be because I’m using a more recent version of React Bootstrap.

The current documentation says React Bootstrap does not come with stylesheets:

Because React-Bootstrap doesn’t depend on a very precise version of Bootstrap, we don’t ship with any included css. However, some stylesheet is required to use these components. How and which bootstrap styles you include is up to you, but the simplest way is to include the latest styles from the CDN.

I don’t want to use the CDN for my project. There are good arguments for using a CDN, but for my purposes, I want to make sure that my stylesheets are available whenever my site is available. So instead, I simply installed Bootstrap. I was actually trying to avoid using this extra install by using the React Bootstrap project! Oh well.

After installing Bootstrap (npm install bootstrap), I opened my App.js file, and added an import to the huge bootstrap css file that was installed in my node_modules directory, like this:

1
2
import '../../node_modules/bootstrap/dist/css/bootstrap.css';
...

This instantly fixed the problem that my home page was not styled. Now I had a nice NavBar similar to the React Boostrap NavBar demos.

Here’s the “before” view:

And here’s the “after” view:

That’s a big difference! I could have waited to figure out what was causing this problem, and I’m still not sure that my solution is the best one. However, it’s more rewarding to work on something that looks nice, and I knew I’d have to do something about this eventually, so I’m glad I fixed it from the get-go.

React Bootstrap removes Navbar.Header

| Comments

Summary: Serverless Stack tutorial breaks because Navbar.Header was removed from React Boostrap package

Serverless Stack is a nice way to discover how to build web apps using React.

However, it sometimes gets out of date. They have a page on “containers” which instructs you to add a React-Bootstrap component called NavBar.Header to your App.js, like this:

1
2
3
4
5
6
7
8
9
10
11
12
13
14
15
16
17
18
19
20
21
22
23
import React, { Component } from "react";
import { Link } from "react-router-dom";
import { Navbar } from "react-bootstrap";
import "./App.css";

class App extends Component {
  render() {
    return (
      <div className="App container">
        <Navbar fluid collapseOnSelect>
          <Navbar.Header>
            <Navbar.Brand>
              <Link to="/">Scratch</Link>
            </Navbar.Brand>
            <Navbar.Toggle />
          </Navbar.Header>
        </Navbar>
      </div>
    );
  }
}

export default App;

If you’ve followed their instructions up to this point, you will now find that the React server crashes with the following error:

1
Element type is invalid: expected a string (for built-in components) or a class/function (for composite components) but got: undefined. You likely forgot to export your component from the file it's defined in, or you might have mixed up default and named imports.

Debugging this issue turned out to be pretty easy. I removed the entire content of the render method except for the outer div, and the error message went away:

1
2
3
4
5
6
  render() {
    return (
      <div className="App container">
      </div>
    );
  }

I just kept adding back React components until I got the error again when I added back <Navbar.Header>. A quick look into the project at github told me that <Navbar.Header> was removed a few months ago. Removing the <Navbar.Header> tags in my local version of the tutorial file was enough to make the errors go away, although the resulting view was not lovely. I talk about how I fixed this React Boostrap style problem in a later post.

I also noticed a warning message in my Javascript console:

1
2
3
Warning: Received `true` for a non-boolean attribute `fluid`.

If you want to write it to the DOM, pass a string instead: fluid="true" or fluid={value.toString()}.

When I changed <Navbar fluid collapseOnSelect> to <Navbar fluid="true" collapseOnSelect>, this warning vanished.

Observer / Observable pattern in Java

| Comments

Summary: A very simple example of the Observer / Observable pattern in Java

I’ve created a very simple example of the Observer pattern using Java’s built-in Observable class and Observable interface.

In my example, a class called ObservableExample extends Observable. It has a method called setCookie which is used to set a String with the name of a cookie such as “Chocolate chip”. When this method is called, its Observer is intended to do something – in this example, it prints a message about what beverage accompanies each type of cookie.

There are three key pieces to this pattern:

  1. The class that implements Observer must override update. The update method is called when the Observable calls its notifyObservers method.
  2. You “register” an Observer with the class that extends Observable by calling addObserver on it. You can add as many Observers as needed.
  3. The class that extends Observable must call the superclass’s Observable.setChanged method prior to calling notifyObservers, otherwise no notification will be sent to the Observer.

Here’s a skeleton of the code, showing all the important parts without implementation details:

1
2
3
4
5
6
7
8
9
10
11
12
13
14
15
16
17
18
19
20
public class ObserverExample implements Observer {
  public void update(Observable obs, Object arg) {
      // Do something depending on arg and/or obs
  }
}

class ObservableExample extends Observable {
  public void someImplementationSpecificMethod(...) {
      setChanged(); // method of Observable superclass.
      notifyObservers(...); // causes update method to be called on any Observers
  }
}

...
// In other code, e.g. main method:
ObservableExample observable = new ObservableExample();
ObserverExample observer = new ObserverExample();
observable.addObserver(observer);
// later...
observable.someImplementationSpecificMethod(...);

This code sample is available as a project in github. That project contains an additional code example which abstains from using Java’s Observable class and Observer interface. This demonstrates that you can do what you want without those tools. However, you have to introduce additional code to manage the notification into your own classes. This makes the code more cluttered, and less clear. Our little demo project is all about serving the right hot beverage with a given cookie. Using the Observer pattern abstracts away functionality which is not crucial to this purpose!

swipe over radio buttons in android

| Comments

Summary: Demonstrating how to register a swipe over a row of radio buttons in Android

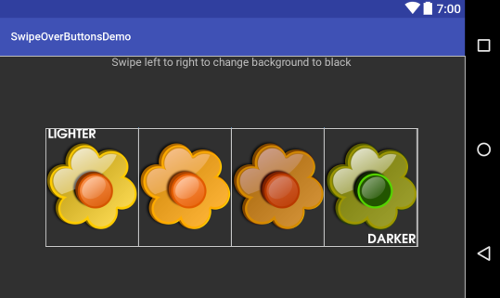
In this Android coding example, a user is presented with a row of radio buttons. Clicking on a radio button causes the background of the application to change to a different color.

That’s the easy part! Here’s the hard part: there’s a secret swipe, from the left edge of the screen all the way to the right edge, which changes the background color to black. Not only do you need to swipe all the way from left to right, you also have to swipe over the radio buttons.

Android is designed to make it easy for radio buttons to register and respond to clicks. This example is complicated because detecting a swipe over the screen, if done incorrectly, may interfere with that mechanism. Also, we don’t want the left-to-right swipe to do anything if it falls outside the radio buttons. So special code needs to be added to check for this when swiping.

The code sample which solves this problem is available as a project in github.

These are the key parts to the solution:

For responding to individual clicks, the radio buttons are given an onClickListener when they are created.

Responding to a swipe is the tricky part. The activity’s onTouchEvent is implemented to check when a swipe starts (with MotionEvent.ACTION_DOWN) and ends (with MotionEvent.ACTION_UP). Then, as the user’s finger moves across the screen, the code in onTouchEvent checks to see if its position stays over the radio buttons.

The radio buttons are laid out in a LinearLayout and given a specific id, surround_layout. If we know the upper and lower vertical boundaries to this layout, then we can check to see whether the user’s “touch” strays outside this boundary while it moves across the screen – when onTouchEvent receives a MotionEvent.ACTION_MOVE event.

Here’s the “design” view of that layout in Android Studio. The boundaries of the layout show up as a white frame.

radio button layout

That’s great, but how do we get the boundaries of the layout when our application is running? The answer is that our Activity implements ViewTreeObserver.OnGlobalLayoutListener. This is done so that the boundaries can be computed after the layout is inflated. If you try to get these values before the view is inflated, you’ll find that the boundaries are not correct.

This code example is useful because it forces you to deal with the way layouts are created and inflated. This is something that is usually safely ignored when programming for Android. However, understanding these details can save you a lot of time when they become important.

centered radio buttons in android

| Comments

Summary: Demonstrating how to line up radio buttons that have different heights in Android

Recently, a client requested that an Android app have some custom radio buttons added. Android radio buttons are similar to those you find on the web. They allow you to select one and only choice. Graphically, they are quite simple by default. Usually each button looks identical. Sometimes, people like to get fancy and include text or make some of the buttons larger or smaller. It is certainly possible to do these things in Android, but your first attempt may look rather ugly.

I created a simple project and added it to my github account to demonstrate the problem. Here is a button that’s supposed to appear at the left of the row of buttons. Notice it has some text below it:

left-most button includes text

Next, here’s a button that will appear in the middle of the row. It does not have any text in it, so its height is less than the other button:

middle button does not include text

When you first add these images as custom radio buttons to your Android app, you get something that’s a little bit ugly. This screenshot shows the problem: technically, your buttons are lined up in a row. However, visually, it looks like they are misaligned, because of the text in the outer buttons:
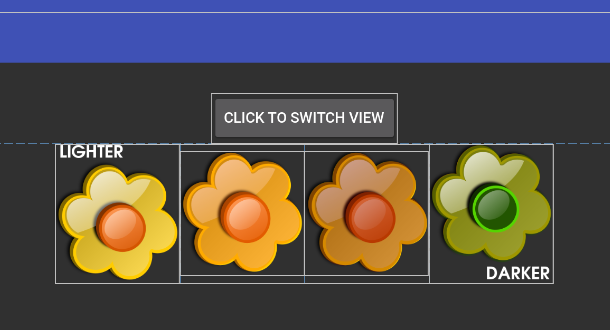
custom radio buttons misaligned

In the screenshot above, the different parts of the layout are highlighted in white to show you their boundaries. Clearly, the outermost buttons are taller than the inner ones.

There are different ways to deal with this, but the simplest one is to rework your buttons so that they all have the same height. That’s what I did. Here are the two new buttons. They look identical, but now they have the same height. The second button is now taller, but it’s just padded with transparent fill.

left-most button includes text

middle button does not include text and is now taller

The new buttons were created by adding each of the four flower images to a single canvas with a transparent background in Gimp (a graphics tool), making sure they were lined up along their center points. Then, a rectangle was sliced around the entire set of buttons, cropping as tightly as possible to avoid excessive space being taken up by any individual button. Then, each individual image was sliced out from the rectangle, keeping their heights all the same.

Once I had the new images, I replaced the old ones in my Android app. Here’s the result:
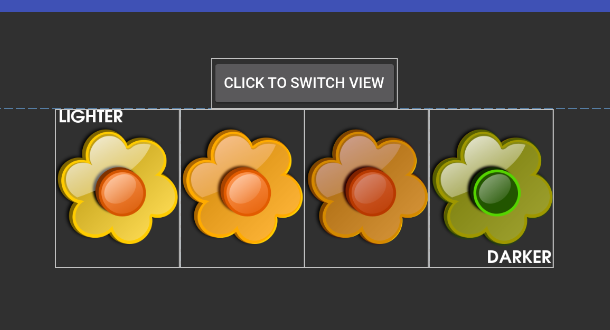
custom radio buttons are centered and aligned

This is a good solution because you aren’t trying to force Android to realign the buttons programmatically. That can get tricky and isn’t really what Android is designed to do. When you add buttons in Android, it is recommended that you set their heights and widths in “dp” in the layout xml file. When writing the code to programmatically change image heights and widths, you’re dealing with pixels. It’s better to just avoid trying to make changes at the pixel level.

You can check out the entire project at github if you want to experiment with it.

[Edit October 2, 2018: It turns out that you can also solve this problem using Android’s ConstraintLayout. This adds a little bit of complexity to the layout, but it has the advantage that the button graphics do not have to be reworked. The github project includes code which demonstrates this option, as well.]

Thanks to inky2010 for making the flower images available in the public domain!

an android hiccup

| Comments

Summary: if you switch to https watch out for this Android bug

One of the Android projects that I’m working on uses the Apache HTTP library, which is located in a library – android.jar – that comes with Android. The project uses the library to connect to an external server using an HTTP GET command. I’ve experienced a couple of problems with this project due to this connection requirement.

(Note: this project is not mine, but belongs to one of my customers, so I’m not the original developer who wrote this code! I’m just dealing with the fallout.)

The first problem occurred when the IP address for the server was changed by the hosting service. I do not know why someone would hard-code an IP address when making a connection, but that was done in this app. The problem was obvious, and the fix was simple enough: change the line of code to point to the domain name (like, “http://example.com”) rather than the IP address. Problem fixed!

The second problem occurred more recently, when the hosting server was switched to use HTTPS. The URL had to be changed – again! – to read something like “https://example.com”. This happened months ago, and no issues were noticed… until a couple days ago, when I was adding a new feature to the app, and it suddenly stopped working!

I checked the logs and noticed an Exception with a lengthy stack trace. Here is the stack trace:

1
2
3
4
5
6
7
8
9
10
11
12
13
14
15
16
17
18
08-23 08:11:23.863 W/System.err(25119): javax.net.ssl.SSLException: hostname in certificate didn't match: <example.com> != <*.hostmonster.com> OR <*.hostmonster.com> OR <hostmonster.com>
08-23 08:11:23.863 W/System.err(25119):   at org.apache.http.conn.ssl.AbstractVerifier.verify(AbstractVerifier.java:185)
08-23 08:11:23.863 W/System.err(25119):   at org.apache.http.conn.ssl.BrowserCompatHostnameVerifier.verify(BrowserCompatHostnameVerifier.java:54)
08-23 08:11:23.863 W/System.err(25119):   at org.apache.http.conn.ssl.AbstractVerifier.verify(AbstractVerifier.java:114)
08-23 08:11:23.863 W/System.err(25119):   at org.apache.http.conn.ssl.AbstractVerifier.verify(AbstractVerifier.java:95)
08-23 08:11:23.863 W/System.err(25119):   at org.apache.http.conn.ssl.SSLSocketFactory.createSocket(SSLSocketFactory.java:381)
08-23 08:11:23.863 W/System.err(25119):   at org.apache.http.impl.conn.DefaultClientConnectionOperator.openConnection(DefaultClientConnectionOperator.java:165)
08-23 08:11:23.863 W/System.err(25119):   at org.apache.http.impl.conn.AbstractPoolEntry.open(AbstractPoolEntry.java:164)
08-23 08:11:23.863 W/System.err(25119):   at org.apache.http.impl.conn.AbstractPooledConnAdapter.open(AbstractPooledConnAdapter.java:119)
08-23 08:11:23.863 W/System.err(25119):   at org.apache.http.impl.client.DefaultRequestDirector.execute(DefaultRequestDirector.java:360)
08-23 08:11:23.863 W/System.err(25119):   at org.apache.http.impl.client.AbstractHttpClient.execute(AbstractHttpClient.java:555)
08-23 08:11:23.863 W/System.err(25119):   at org.apache.http.impl.client.AbstractHttpClient.execute(AbstractHttpClient.java:487)
08-23 08:11:23.863 W/System.err(25119):   at org.apache.http.impl.client.AbstractHttpClient.execute(AbstractHttpClient.java:465)
...
08-23 08:11:23.863 W/System.err(25119):   at android.os.Handler.handleCallback(Handler.java:615)
08-23 08:11:23.863 W/System.err(25119):   at android.os.Handler.dispatchMessage(Handler.java:92)
08-23 08:11:23.863 W/System.err(25119):   at android.os.Looper.loop(Looper.java:137)
...

The first line is key: “javax.net.ssl.SSLException: hostname in certificate didn’t match: <example.com> != <.hostmonster.com> OR <.hostmonster.com> OR <hostmonster.com>”. My customer is using hostmonster to host their external server. What’s going on?

When I saw this message, I thought the server might be down. The logs contained the URL being requested, so I accessed that URL in a browser, and found it was working just fine.

A simple search for javax.net.ssl.SSLException did not reveal a simple explanation for this error. After substantial hunting, I found a StackOverflow question which provided a clue – it seemed to be related to SNI (server name indication) support. That page pointed to another question at StackOverflow – Why does android get the wrong ssl certificate? (two domains, one server) which made things more clear.

The answer is that the client (the app, in this case) needs to support SNI, and if it does not, the server may send the wrong SSL certificate. That definitely seemed to be happening here. As recommended in the answer to that SO article, I rewrote the app code to use java.net.HttpURLConnection, and the app was fixed immediately. You might think it would be required to use HttpsURLConnection, but it worked perfectly fine with HttpURLConnection.

I did not research the problem much further. I noticed another open-ended question at SO asking what’s the deal with SNI support in Android.

Most of these questions and responses are fairly old. I found a discussion at Google’s issue tracker with the following remarks (from 2010 and 2011!):

1
2
3
4
5
6
7
8
9
10
11
12
13
14
15
16
17
18
19
[bd...@google.com says:]
The main problem with supporting SNI in the browser is that many sites choke on TLS extensions, especially lesser known ones. Chrome and other browsers try to retry the connection without TLS (and without compression, which technically is SSL and not TLS) 

We have moved forward with this in 2.3 (Gingerbread) and javax.net.ssl.HttpsURLConnection does attempt to handshake with SNI (and automatically falls back to SSL w/o compression if there are problems). Unfortunately the browser uses Apache HTTP Client and there was not a simple local fix to make it retry failed connections, so it is overly conservative and does not include SNI information.

[vi...@gmail.com says:]
Non "corporate gibberish" summary : 
 * Gingerbread (2.3) Will never get this update officially. 
 * Honeycomb (3.0) contains the fix but isn't available on phones. 
 * Ice Cream Sandwich (4.0) will provide this feature to phones but isn't already available (soon). 

Also : 
 * The fix from Honeycomb could have been backported by the manufacturers that got it's source code but none that I know off did it. 
 * As Honeycomb is a closed source release none of the alternative distribution could merge the patch without re-developing it. 
 * As Ice Cream Sandwitch will include this patch it will be in all distributions and could even be backported to Gingerbread. 

Sadly coupled with the fact that google don't control at all the updates of previous phones it lock SNI in an "Unusable for most of Android users" state for 2+ Years at least for environements where you don't control users hardware. 

At least now for companies you could plan an upgrade (software or hardware depending on the phone models your employees got) as soon as ICS is released

I still don’t know why this problem appeared so suddenly. It could be due to some change at hostmonster (seems most likey), or it could be due to a change in the OS on my test device.

For the record, here’s the fixed code:

1
2
3
4
5
6
7
8
9
10
11
12
13
14
15
URL testUrl = new URL(urlString);
HttpURLConnection urlConnection = (HttpURLConnection)testUrl.openConnection();
urlConnection.setRequestMethod("GET");
urlConnection.connect();
int code = urlConnection.getResponseCode();
InputStream in = urlConnection.getInputStream();
BufferedReader bin = new BufferedReader(new InputStreamReader(in));
String inputLine;
StringBuffer sBuffer = new StringBuffer();
while ((inputLine = bin.readLine()) != null) {
  sBuffer.append(inputLine);
}
in.close();
String result = sBuffer.toString();
// do something with the result...

in praise of testing

| Comments

Summary: testing is good… no, great

I’ve been working on a website based on node.js for about 1.5 years now. I didn’t create the site, and when I got it, I saw that 1) it had a very extensive code base and 2) a small number of tests had been written relative to the size of the code base.

It’s understandable; I can see the temptation to avoid coding tests when you’re not really sure if the code will just end up being thrown away. The time spent writing tests could (perhaps) be more productively spent adding new, vital features.

In any case, I decided I needed more code coverage, because I hate it when I fix a bug or add some feature, only to find that it has been broken in some obscure way months later. Having a large suite of tests to run won’t always protect against this kind of thing, but it does help some.

Most recently, I’ve been writing a new, fairly complicated feature. It’s nearing completion. I’ve been writing unit-like tests all along, but I decided in the end that it would be worth writing some integration-like tests that run against a working dev server. The second integration test that I wrote kept failing – immediately. It looked okay. I kept debugging it until I was nearly sure that it should pass. So I went back and looked at my server code. VoilĂ ! My server code was at fault. Nerds! To be honest, I rarely find that tests so quickly uncover a bug. But it happens often enough, and it gives me a warm fuzzy feeling about testing!

coursera algorithms part i

| Comments

Summary: The coursera course Algorithms Part I is worth it, with some caveats

My educational background is in physics and math, not computer science. I’ve taken exactly one computer course (Pascal) as an undegraduate. Aside from that, the programming knowledge that I’ve got was all self-taught: from the Basic programs that I wrote as a teenager on my father’s Commodore 64, to the Fortran code that I wrote to study physical systems in grad school, it was all stuff I had learned on my own or from building on the code of others.

When my career took a left turn, and I started developing for web applications, my background served me well. However, I had the feeling that I was missing some things that I would have learned if I’d gone into a computer science degree program. This is hammered in when you go for job interviews where they ask you abstruse computer science questions.

Even so, it’s been hard to make myself study something like algorithms – there’s just so much time in life, and there always seem to be more urgent things to do… But then I noticed the Coursera course in algorithms, and finally decided to take a swing at it. This is Algorithms, Part I. The promotional material reads: “This course covers the essential information that every serious programmer needs to know about algorithms and data structures.” To top it off, it’s a Princeton University course – at no charge! What more could you ask for? And they tell you that the course requires “6-12 hours of work / week” for 6 weeks. I can certainly afford that! It seems time well spent.

I didn’t have much time during the month of June, but I figured I could catch up. It has not been easy! Each week covers 2 topics. Week 1 covers the “Union-Find” algorithm, and also “Analysis of Algorithms”. I just finished the first programming assignment for “Union-Find”. It didn’t take long for me to get running code which did what the spec wanted – perhaps 3 or 4 hours. But that’s not enough. When you submit your code, it’s run through an automated grading system. Little bugs which seemingly shouldn’t count for much can result in nearly complete failure.

In my case, I uploaded the assignment 5 different times, each time resulting in an improvement until it passed with 100% the very last time. The first couple times I had to debug a few items because I had misunderstood the spec for a couple of API methods. In one particularly nasty bug, I had somehow managed to use the wrong version of their algorithm class (QuickFindUF instead of WeightedQuickUnionUF) in my code – oops! That turned out to be very difficult and time-consuming to discover. The automated grading system gives you hints about what is going wrong, but in some cases it just appears to be annoyingly cryptic.

Fortunately, there’s a tipsheet that goes with each assignment. And there are also discussion forums for when you get really desperate. With all this help, it still took me at least 10 hours to finish just this initial programming assignment, and I haven’t even touched the next one yet. I hope things go faster from here on out, but I’m skeptical about that.